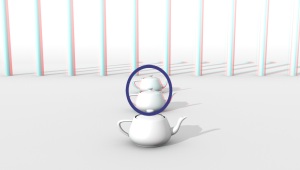
In the spring of 2011 I co-taught a stereo3D filmmaking class. During those few months I was really on top of what it took to create convincing S3D images. Since then I had not made another S3D image until last month. Though for over a year I have been slaving away on an S3D film, I have only looked at it in terms of a left image and a right image – making sure that the green screen removal, roto, color, and rendered virtual set was correct for both.
It seems I lost some of the knowledge I had attained in the spring of 2011 and even before in 2009 when I created an S3D animated music video. I had decided that it was correct to not converge parallel rendered stereo pairs. I had also forgotten how to view anaglyphs in terms of knowing what parts of the image were in front of the screen (“window”) and what was behind. Luckily, Chris Churchill noticed that the stereo grading on Europa was not going well and took it upon himself to fix it because what I was saying was wrong. My head was in animating, roto, patch work, and other compositing issues, rather than actually making the 3D part of the S3D film. To get my head back in it I decided to make the following images to help me get it right and make a record of it;)
Most S3D CGI creators I have read, watched, or listened to said that they prefer creating stereo pairs in parallel, which means that the left and right cameras are looking straight ahead. After the imagery is rendered it is then converged, which generally means that the images are shifted in the x direction until an object or area in depth has no parallax, or left/right offset. The converged object/area is essentially at the plane of the movie screen (the “window”). If a parallel pair is not converged then all of the depth is in front of the screen (window), which can cause eye-strain over time.
Click on the images to see them full sized. Parallel Cameras (first) and Converged Cameras (second). Notice that red is on the left in front of the convergence plane (screen) and cyan is on the right in front of the convergence plane.
The parallel image (first) shows that all of the depth is in front of the window/screen and the blue ring is on the screen (essentially converged). As you view the image you will probably feel some discomfort because the ring is covering parts of the image that are supposed to be in front of it. As you view the converged image (second) it should feel more comfortable because the foremost teapot is converged so the ring and the teapot are at the screen and everything else is behind it. Also notice that the red and cyan offset images change sides horizontally – red is on the right for objects past the screen and on the left for objects in front of the screen. These are fundamentals of making stereo3D images and should not be forgotten!
Another issue with S3D images is keeping control of how much x-shift (parallax) is needed to produce the final image. If the left and right cameras are too close together there is little resulting parallax and little stereo effect. Cameras too far apart create a problem called hyper-stereo, where the stereo effect is not realistic because the cameras are proportionally farther apart than our own eyes. Hyper-stereo can be seen by the large offset images of red and cyan, and with glasses on, the effect can be easily seen by moving one’s head side-to-side (image seems to jiggle with your head movement). If the cameras were too far apart then it may be impossible to get the parallax close enough for the viewer to fuse the image at all depths. It is best to not photograph a very deep scene with objects close to the cameras. For CGI, the fix is simply to put the cameras closer together. For live-action, the fix may be to move the convergence point into the scene more and bring some of it in front of the window (screen). For some live-action shots the fix may be to do a 2D to 3D conversion. Live-action scenes with virtual sets or all animated scenes get around this problem by having different camera inter-axial distances for different depths of the shot. Backgrounds can have a closer inter-axial distance than the foregrounds to avoid excessive parallax.
The first image shows the result of parallel cameras with no convergence – you may have a hard time getting it to fuse due to the wide parallax. Notice how the red/cyan offsets are less in the background than the foreground – as humans look into the distance we eventually don’t see two points-of-view of an object and our vision becomes monocular (takes about 50′ of depth). Since we focus on one object at a time with our eyes we don’t notice the double vision (inability to fuse that part of our view) in the foreground when looking at another object very far away. Unfortunately, this does not work for S3D imagery – the entire image must fuse properly and back to an earlier point, the image must have some convergence, otherwise everything is in front of the screen. The second image converges on the foreground teapot. Notice the red band on the left – I shifted the right image 144 pixels of a 1280 wide image to get the convergence. Overall it works, but it takes a little time to fuse the background because of the wide parallax (x-shift). In the third image, to make it a little easier to fuse the stereo effect I moved the convergence to between the first and second teapot, which brings the first teapot in front of the screen (window). This is a decent compromise when dealing with hyper-stereo pairs. BTW, to get rid of the red band you either have to scale the imagery up, which is common for live-action footage, or you have to render wider images than your final output width.
An alternative to all this shifting around is to shoot/render with converged cameras. The fundamental problem with converged cameras is that once shot or rendered, the imagery cannot be re-converged and due to some mild keystoning, the stereo pair can be harder to work with doing post visual effects with serious tools, such as the Foundry’s Occula.
WordPress did not do me any favors with crunching these images. Unfortunately, you may see some ghosting caused by heavy compression.
Last point: Never get your stereo pairs swapped. Left for right and right for left can leave you scratching your head because in some cases, especially shallow scenes, the stereo effect will seem to work, but just not as cool as you expected. If your Supervisor/TD accidentally swaps them a year before you actually do any stereo depth grading and don’t notice then dock his pay at least;)


You must be logged in to post a comment.