The 90th anniversary of the opening of the Little Rock Central High School building and the 60th anniversary of the Desegregation Crisis are coming September 18-25, 2017. It will be a week of activities that commemorates the anniversaries and culminates in an event that features a projection mapped animation on the façade of the high school building.
This first blog post is about a major milestone for the animation, which is a completed virtual 3D model of the facade including its four statues. Now that the model is complete we can finally get to work. The majority of the animation we create will be based on the architectural structure of the facade. I can’t believe February is almost over! It took me over a week longer than I expected to finish this phase of the project due to distractions including an illness that caused horrible headaches as well as external issues and projects and some personal goals beyond the projection mapping project. Hopefully the headaches are past – I can manage the rest.
Here’s the basic model:

We can add lighting that can make it appear as if we’ve hung actual lights near the building:

We can also play around (this is just a test and not final imagery):
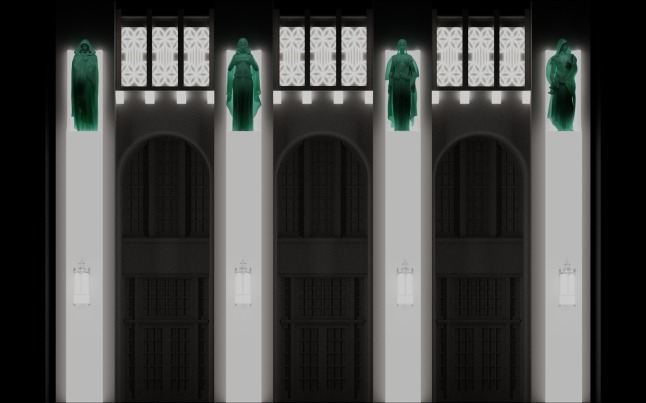
And add stuff:

Here’s what it should look like at the campus. We intend to add some lighting around the central facade as well.

The Facade
The limestone part of the high school’s main entry has several nice 1920s Art Deco details and is sculptural in nature with deep set doors and windows and jutting pedestals for the four statues. I still need to add the letters for the statues. We will hopefully be able to temporarily cover the windows and doors so they won’t be so dark. We will also need to cover the lanterns so they will reflect the projections.
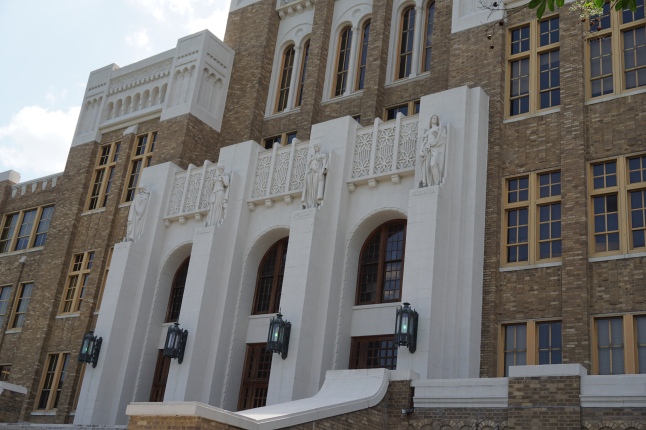
Ambition, Personality, Opportunity, and Preparation
When facing the building the four statues from left to right are Ambition (male), Personality (female), Opportunity (female), and Preparation (male).
I’ve been told that the four statues were “ordered from a catalog” and not unique to the building project. Their body styles are reminiscent of Michelangelo sculptures with their long muscular arms and Greek facial features. Preparation must have been the sculptor’s version of David – see his contrapposto stance, physique, lowered right arm (holding a scroll in this case), raised left arm holding a book instead of a sling, and a left-facing gaze.
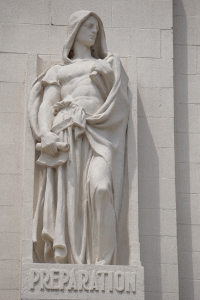

Their dress is based on ancient Greek Chiton. The sculptural style is “wet drape” where the cloth clings to the skin to reveal the figure’s body underneath. This is most obvious in Preparation with his torso that practically looks bare, and you can see it in Opportunity as well. I modeled these statues by starting with nudes so I could get the wet drape look right.
I think later blog posts will go on another website dedicated to this project. Geeky stuff will stay on this blog though.
Geek Stuff (most of you will want to skip this)
I modeled the facade by building basic geometric shapes and aligning them to a photograph I took last summer. I actually got most of this model finished by last fall. In January I added the smaller details and lanterns.
The statues were very time consuming and I knew they would be… I downloaded a few nude “base models” from Blendswap, which are designed to be a starting place for creating a character. For the females, I used the body of one and the hands and head of another. After splicing them together I pushed and pulled and extruded faces, edges, and vertices to make them match the sculpture. I also used sculpting tools to smooth and guide areas of the model. The models are considered low-poly, which makes them easy to animate and handle in the 3D software. When they are rendered they are smoothed using Pixar’s subdivision surface technology. It turns a blocky mess of polygons into flowing garments.
For the capes I essentially started with a line and extruded it and moved it to create the overlapping folds. For smaller details I just cut the larger polygonal faces into smaller ones that I could then push, pull, and sculpt into their final form.
Once a model seemed ready to go I aligned it with the main photo of the facade. I had closeups of the statues to do most of the work, but since the photos were taken from below, the proportions were not accurate so aligning with the main photo was key to getting them the correct overall size. Because of the proportion issues and a number of other things, I modeled them just looking at my photos rather than trying to align them to photos in the 3D viewport, which is common for character design.
While modeling, the virtual statue is standing in a T-pose. I used a T-pose because we will most-likely apply some custom motion capture animation and our motion capture system (Perception Neuron) requires a T-pose to start. Another common starting point for a character model is an A-pose, which is more relaxed, but not a good idea for our purposes.
After getting the proportions correct I added a skeleton to the model. The skeleton is based on the needs of the motion capture system. The model is bound to the skeleton so whenever I move a bone, the model with deform with it. I used the bones to pose the model to match the statues. I actually animated the movement so I could go back to the T-pose easily as well as test the model deformations as the bones moved. Some of the dress is not driven by the skeleton at the moment. That will come later via cloth simulations.
I modeled the statues this way because I knew we would be animating them and they needed a structure that would support animation. A more accurate alternative to modeling by eye would have been to scan the actual sculptures. Scanning could be done via LIDAR, but would have been prohibitively expensive. Or, it can be done with lots of photographs from multiple angles via photogrammetry. Shooting the sculptures with a drone and extracting frames from the video would have been a way to get the images needed.
The upside to scanning would be a very accurate model, but there are downsides. One is that the scan would have to be retopologized, which can be time intensive, to make it animatable. Another is that the models would not have a backside and the arms would be stuck to the bodies so they would need hand modeling to create the back and make the arms free. I would have been up for these things had they been scanned last fall. Unfortunately they are 22 feet above the ground so logistically it is not a trivial issue to get to them.
From here it is a matter of lighting, creating cool surface materials, animating the statues, opening the doors, or whatever else we come up with. Even things that don’t directly change the facade, such as showing a photo, will be rendered against the virtual facade so the photo will appear to interact with the building.
Blender

I used Blender to do all of this work. It is just a joy to use. Some things that came in handy (these aren’t necessarily unique to Blender BTW):
- Use photos as a background in the camera viewport to help create a 3D environment that is similar to the size of the actual building
- Changed one of my 3D panels into an image viewer so I could have a photo of a statue up at all times.
- The Shift Key – I use a Wacom Intuos 4 Medium when working with graphics software. It has a bad habit of moving during a click or not really making the mark you tried because it was so small. When changing a parameter in Blender (practically no matter what it is), you can hold down the Shift Key while doing it and it will increase the accuracy of the parameter by not allowing it to change drastically no matter how much you move the stylus. I can make big movements to do small changes. BTW, some graphics programs do have a similar function, just not all…
- Matcaps – haven’t really used them before, but they make modeling organic forms much easier. They allow you to customize how the model is shaded in the viewport so you can see the curved surfaces easier.
- Proportional Editing – Used when moving a vertex or small group of vertices and wanting surrounding vertices to move with them, but not as much. Super helpful when making proportion changes or needing to move parts of the model around to accommodate the posed body. Especially useful is the “Connected” mode where it will only move vertices connected to the one you are moving rather than ones that are just nearby. You can also change the falloff to control how the other non-selected vertices will change. BTW, this works on more than just vertices, just using that as an example.
- Subdivision Surfaces – Blender can show the subd effect while editing the model either by showing the base model and the smoothing separately or by bending the base model’s edges along the surface of the smoothed model. This really helps know how the changes of the low resolution model will change the smoothed model.
- Solidify modifier – I made the capes a single polygon thickness and used this modifier to give it dimensional thickness. When sending the models out to Jim and Jonathan, who use Cinema4D and Maya, I will “Apply” this effect to make the geometry permanent.
- Cycles with two GPUs – it’s so fast! To do test renderings and make the images in this blog post it is amazing how fast Cycles can be. The images here took about a minute and a half to render each one. It’s also crazy easy to make objects into light sources. I do most of the work on my iMac and then switch over to my Linux computer for rendering.

You must be logged in to post a comment.